Overview
Match your viewport's color grading to any reference image.The plugin analyzes both the viewport and your reference, then automatically applies color corrections via a PostProcessVolume.
Opening the Plugin
Method
- In the Unreal Editor top menu bar, go to Window > Color Match.
Result
- The Color Match window will open as a floating panel.
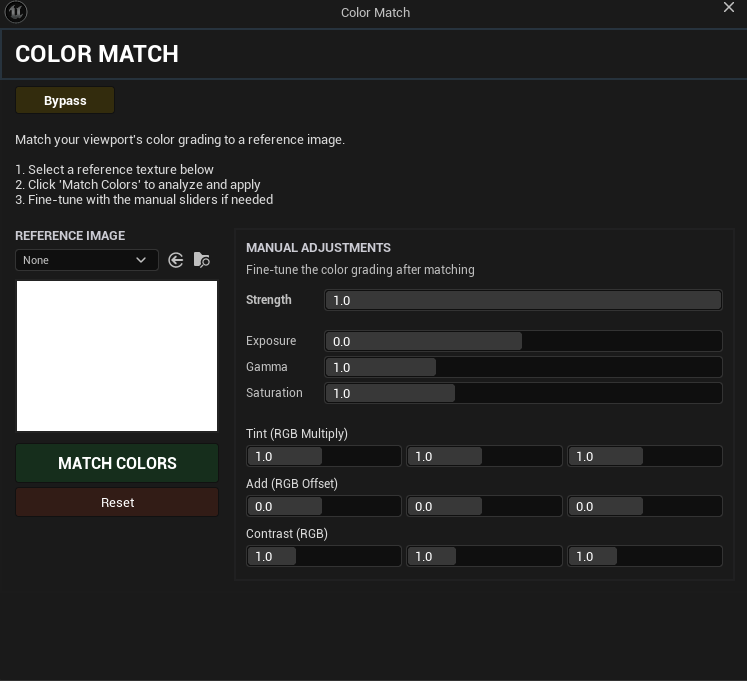
Interface Overview
The window is divided into two main areas:
- Left Panel – Reference image selection and action buttons
- Right Panel – Manual adjustment sliders
Step-by-Step Walkthrough
Step 1: Select a Reference Image
In the left panel, use the Reference Image asset picker to select a Texture2D asset from your project.
You can:
- Click the dropdown and browse your Content Browser
- Drag and drop a texture from the Content Browser into the picker
Once selected, a 200x150 preview of your reference image will appear below the picker.
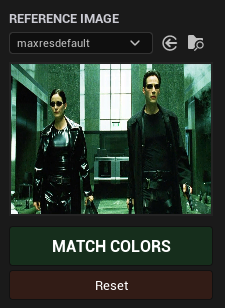
Step 2: Match Colors
Click the green "Match Colors" button.
The plugin will:
- Capture the current viewport scene colors
- Analyze both the viewport and the reference image (mean color, standard deviation, luminance, min/max per channel)
- Compute optimal Exposure, Gain, Gamma, Contrast, Saturation, and Color Offset values
- Create (or reuse) an unbound PostProcessVolume labeled "NativeGradeMatch_PostProcess" in your level
- Apply all computed color grading settings immediately
Your viewport will update in real-time to reflect the matched color grade.
Step 3: Fine-Tune with Manual Sliders
The right panel provides manual adjustment sliders to refine the result.All changes apply in real-time.
| Slider | Range | Description |
|---|---|---|
| Strength | 0.0 - 1.0 | Controls blend intensity of the entire color match. 0 = no effect, 1 = full match |
| Exposure | -4.0 to +4.0 | Overall brightness in EV stops |
| Gamma | 0.2 - 3.0 | Midtone brightness curve. 1.0 = neutral |
| Saturation | 0.0 - 3.0 | Color intensity. 1.0 = neutral |
| Tint (RGB Multiply) | 0.0 - 2.0 per channel | Per-channel color brightness multiplier |
| Add (RGB Offset) | -0.5 to +0.5 per channel | Lifts or lowers shadows per channel |
| Contrast (RGB) | 0.0 - 3.0 per channel | Per-channel contrast adjustment |
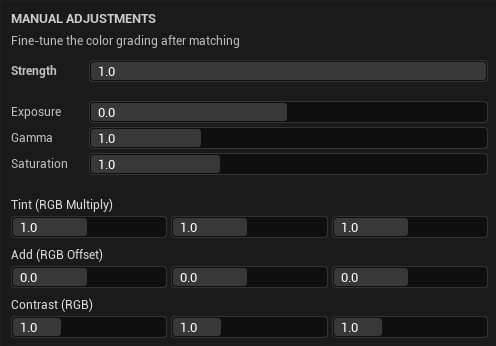
Step 4: Compare with Bypass
Click the "Bypass" button (amber) to temporarily disable the color grade and see the original viewport.
Click "Enable" (green) to restore it.
This allows quick A/B comparison.

Step 5: Reset
Click the red "Reset" button to clear all color grading and return the viewport to its original, ungraded state.
This removes all PostProcessVolume settings applied by the plugin.

Tips
- The Strength slider is the fastest way to dial back an overly aggressive match
- Use Tint (RGB Multiply) to push the overall color temperature warmer or cooler after matching
- The generated PostProcessVolume persists in your level and can be manually edited in the Details panel if needed
- You can re-match at any time by selecting a new reference texture and clicking "Match Colors" again